| Chevy Performance - PROFORM CARBURETOR MAIN BODIES |
|
Proform main bodies for Holley® carburetors. Get that extra performance out of your ride in less than 30 minutes!
Add up to 25-50 HP with PROFORMâS 100% NEW high-performance carburetor main body. Easy swap-in, swap-out installation utilizing
existing metering blocks, fuel bowls, and base plate. Note: More parts will be added as time permits. If you donât see the Proform part you are looking for, give us a call and if we donât have it in stock, we will try to get it for you. We have much more Proform parts in stock then we have time to put on our web site. |
|||||||||||||
| |||||||||||||
| WEB SITE NAVIGATION INFORMATION |
| If you have you just came from a search engine and are stuck with no navigation, turn on Java Scripts in your Web browser, reload the page, then you can turn off Java Scripts again. Also, people using Internet Explorer have to use the pull down tab next to the back button to return to a search engine. More information on this is on our help page. |
| GM and Chevy Performance part prices are in the Price & Parts search. Keys are to be used with the Price & Parts Search. Enter a Key, part number, GM, SC, or a key word, like 502, into the Price & Parts search to see if we have it on our site. Use GM for a list of both GM and GMPP parts. Use SC for a list of all Chevy Performance exclusive parts. Aftermarket company prices are on downloadable Price Sheets or on their pages. The Page Search is for searching the pages of our Web site. More information on this is on our help page. |
| PROFORM WEB SITE LINKS AND SEARCH HELP |
 |
     |
| PROFORM NAVIGATION |
| PROFORM HIGH-PERFORMANCE CARBURETOR MAIN BODY INFORMATION |
|
• Direct replacement component! • Adds up to 25-50 horsepower in less then 30 minutes! • Utilizes existing metering blocks, fuel bowls, and baseplate! • Flows up to 870 CFM! • 100% NEW! - Not a used core. • Dyno-Proven horsepower and torque gain. • Maximum air-flow: No air horn, choke tower, or choke control. • High performance down-leg boosters. • Includes all necessary replacement gaskets! P/N 67100C - Component for use on Holley® 650 CFM (#4777) & 750 CFM (#4779) Double Pumper® with Mechanical Secondary. P/N 67101C - Component for use on Holley® 750 CFM (#3310) Vacuum Secondary Carburetors. Other Applications: 0-4777, 0-4777C, 0-4777S, 0-804777, 650 CFM 0-4778, 0-4778C, 0-4778S, 0-804778, 700 CFM 0-4779, 0-4779C, 0-4779S, 0-804779, 750 CFM 0-4780, 0-4780C, 0-4780S, 0-804780, 800 CFM Info: Holley® is a registered trademark of Holley Performance Products, Inc. PROFORM® is a registered trademark of Specialty Auto Parts U.S.A., Inc. This product is manufactured by Specialty Auto Parts U.S.A., Inc. and it is not made or endorsed by any other carburetor manufacturer. PROFORM™ manufacturing specifications assure that this component is manufactured to exacting standards for quality and reliability, utilizing our own precision production process and individually specified sub components. These two products are manufactured by Specialty Auto Parts U.S.A., Inc. and they are not endorsed by any other carburetor manufacturer. Note: Not legal for sale or use on emissions controlled vehicles. |
 |
| PROFORM MAIN BODY FOR HOLLEY® 650 CFM (#4777) & 750 CFM (#4779) |
| Part Number | Description | Picture |
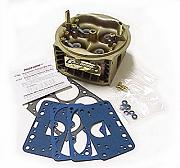
| 67100C |
Direct Replacement Carburetor Main Body: Component for use on Holley® 650 CFM (#4777) and 750 CFM (#4779) Double
Pumper® with Mechanical Secondary. Get that extra performance out of your ride in less than 30 minutes! Add up to
25-50 HP with PROFORMâS 100% NEW high-performance carburetor main body. Easy swap-in, swap-out installation utilizing
existing metering blocks, fuel bowls, and base plate. Involves only 14 screws. Comes in Clamshell package with
instructions, all necessary non-stick replacement gaskets and high-performance jet kit. Flows 750+ CFM, adjustable
screw-in air bleeds, high-performance down-leg boosters. Get maximum air flow with no air horn, choke tower, or choke
control. Click here for installation instructions. Click here to see larger image. |
 |
| PROFORM MAIN BODY FOR HOLLEY® 750 CFM (#3310) |
| Part Number | Description | Picture |
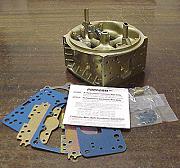
| 67101C |
Direct Replacement Carburetor Main Body: Component for use on Holley® 750 CFM (#3310) Vacuum Secondary Carburetors.
Get that extra performance out of your ride in less than 30 minutes! Add up to 25-50 HP with PROFORMâS 100% NEW
high-performance carburetor main body. Easy swap-in, swap-out installation utilizing existing metering blocks,
fuel bowls, and base plate. Involves only 14 screws. Comes in Clamshell package with instructions, all necessary
non-stick replacement gaskets and high-performance jet kit. Flows 750+ CFM, adjustable screw-in air bleeds,
high-performance down-leg boosters. Get maximum air flow with no air horn, choke tower, or choke control. Click here to see larger image. |
 |
| INSTALATION INSTRUCTIONS |
|
To properly install your new carburetor main body please follow these simple step-by-step
instructions. Please use proper safety precautions when handling gasoline. 1) After removing the carburetor from the engine, drain all gasoline from the fuel bowls. This can be accomplished by removing one of the lower fuel bowl screws and allowing the fuel to drain into an approved container. With a funnel, turn the carburetor upside down, activate the throttle several times to drain the fuel out of the accelerator pump cavities. 2) Before proceeding any further, you should check to be certain that your new carburetor main body will fit your carburetor. With your carburetor upside down, the throttle plates will have a number stamped in them. These numbers should be either 172 or 173. If they are not, measure the throttle bore diameter to be certain your carburetor has 1 11/16” throttle bore. If it does not, the new carburetor main body will not work properly with the remaining components from your original carburetor. 3) Once the fuel bowl has been emptied, you can now remove the remaining three fuel bowl screws. 4) With the fuel bowl screws removed, attempt to separate the fuel bowls and metering block(s) from the main body. If these components cannot be removed by hand, it is likely your carburetor has been assembled with “sticky” adhesive coated gaskets. Note: vacuum secondary carburetor will have a secondary metering plate. The six retaining screws can be removed with a #3 Clutch Head Screwdriver. 5) Separating these components can be somewhat difficult, but not impossible. With a soft-faced hammer, tap repeatedly on the sides of the fuel bowl and metering block in an effort to break the gasket seal. If this method proves unsuccessful, it will then become necessary to pry the components apart. This is a last resort, when all other methods fail. Wedge a large-blade, common-tip screwdriver between the air cleaner ring and center the metering block away from the main body. Once the fuel bowl and metering block separate from the main body, turn over the assembly and attempt to pry the metering block away from the fuel bowl, using the accelerator pump housing as an anchor and press outward on the accelerator pump boss on the bottom of the metering block (where the aluminum plug is located). 6) Now remove the throttle from the main body, using a number 2 phillips head or larger screw driver. NOTE: vacuum secondary carburetors, remove the e-clip that retains the vacuum secondary diaphragm stem to the secondary throttle shaft lever. Save this clip as you will reuse it during assembly. 7) Prepare the metering block and fuel bowl for reassembly by removing all gasket material. Although with “stick” type sealant this is a difficult and time consuming process, optimum performance can only be achieved with clean sealing surfaces. Softening the gasket material with a quality carburetor cleaner is an effective way to dislodge the gasket and sealant. 8) For best performance it will likely be necessary to change the jetting. A good starting point for 67100C mechanical secondary applications will be #72 jets on the primary side (front), and #84 jets on the secondary (rear). For 67101C vacuum secondary applications, #72 jets on the primary side, and no change on the secondary plate. This calibration is based on using a power valve in the primary metering block and a power valve block off plug in the secondary metering block. These are merely baseline recommendations and it will be necessary to monitor spark plug coloration to achieve a sandy brown color in the porcelain section indicating best performance and to prevent any potential engine damage due to improper air/fuel mixture. Jets are included per the above applications. 9) Reassembly begins with reinstalling the throttle body. If your throttle body has two locator dowel pins, install the provided gasket on the throttle body. If your throttle body does not have locator pins, with the carburetor upside down, position the gasket to line up with the bolt holes. 10) Insert the six retaining screws (yes, there are only six not eight, the two center screws are not used) and tighten in a crisscross pattern. Target torque specification is 30 inch pounds (2.5 ft. pounds) with a minimum torque value of 20 inch pounds (1.7 ft. pounds). 11) Install the new metering block and fuel bowl gaskets on the metering block(s). These gaskets should align with the cast-in-pins. Note: for vacuum secondary carburetors, install the metering block gasket provided (the one without the large cut out in the center) insert the small paper gasket between your old metering plate and the new steel reinforcement plate provided. Position this assembly on the new carburetor main body so the alignment pins enable the metering plate assembly to fit flush to the main body gasket. Insert the six clutch head screws and tighten in a crisscross pattern to the target torque value of 18 inch pounds (1.5 ft. pounds). 12) On the primary side, position the metering block on the new main body so the alignment pins allow it to sit flush. With the accelerator pump arm in the upright position, install the fuel bowl. Note: be sure the accelerator pump arm is positioned on top of the fuel bowl accelerator pump operating lever. It may be necessary to slightly rotate the fuel bowl clockwise to put the fuel bowl on. Once in position, install the new nylon fuel bowl gaskets provided (be sure to remove all of the old gaskets) and insert the fuel bowl screws. Tighten in a crisscross pattern to a target torque value of 30 inch pounds (2.5 ft. pounds). It is important these screws be tight as poor idle and off-idle performance will result. 13) Secondary installation is the same as the primary side. 14) Vacuum secondary applications, it will be necessary for you to remove the secondary vacuum diaphragm assembly from your old main body. If your carburetor had a choke assembly, you will have to remove the choke assembly first. The vacuum diaphragm housing is held in place with three screws. After removing the housing from the old main body, check to be sure the small cork sealing gasket is still positioned in the recess provided in the housing. If this gasket will not stay in position, use a small amount of glue or grease to hold it in position for re-assembly. (Be sure none of the glue or grease protrudes into the vacuum passage) Install the vacuum housing on your new your new main body using the old screws. Tighten the front screw until it contacts the housing. Then tighten the lower rear screw, the center screw and finally tighten the front screw completely. Do not over tighten these screws. You are simply tightening the screws enough to seal the housing to the main body. Maximum torque is 18 inch pounds. Re-attach the e-clip to secure the diaphragm stem to the throttle shaft lever. 15) You are now ready to reinstall your upgraded carburetor! There are numerous outstanding books available to help you tune your new carburetor. We highly recommend you purchase one of these books as they will walk you through the fine tuning process step-by-step. Recalibration will enable you to achieve the maximum performance potential available from your new state-of-the-art PROFORM® Carburetor Main Body! |
