| Chevrolet - TREMEC T56 HELPFUL PICTURES |
|
Car Craft magazine January 1994 T-56 article continued. The pictures on this page will help with understanding what is
needed to make this installation. Depending on the vehicle you are trying to put this transmission into, you may have more or less alterations that will
need to be done. This is in the Price Search along with the GM and SC parts. We don't have an Excel price list from Tremec for you to download as of yet. Key - tremectrans |
|||||||||||||
| Featuring Chevrolet and GM Performance Parts. |
| ||||||||||||
| WEB SITE NAVIGATION INFORMATION |
| If you have you just came from a search engine and are stuck with no navigation, turn on Java Scripts in your Web browser, reload the page, then you can turn off Java Scripts again. Also, people using Internet Explorer have to use the pull down tab next to the back button to return to a search engine. More information on this is on our help page. |
| GM and Chevrolet part prices are in the Price & Parts search. Keys are to be used with the Price & Parts Search. Enter a Key, part number, GM, SC, or a key word, like 502, into the Price & Parts search to see if we have it on our site. Use GM for a list of both GM and GMPP parts. Use SC for a list of all Chevrolet exclusive parts. Aftermarket company prices are on downloadable Price Sheets or on their pages. The Page Search is for searching the pages of our Web site. More information on this is on our help page. |
| TREMEC RETRO-FIT T56 DISCRIPTION |
 |
 TREMEC T-56 Six Speed Transmission Click on the Tremec Logo above to go to Tremec’s web site.
TREMEC’s GM aftermarket replacement T-56 six speed is designed to replace the T5 five speed in the 82-92 Camaros and
Firebirds. This transmission can be used for many other applications with small modifications.Visit Tremec’s T56 page. Installation is not as hard as you might think. Use the links in the Tremec T56 Navigation bar to help you understand what it will take to do the installation. This page continues the Car Craft magazine January 1994 T56 article from our main Retro-Fit T56 page. |
| Gear-ratio Spread: 2.97:1, 2.07:1, 1.43:1, 1.00:1, 0.80:1, 0.62:1 forward, and 3.28:1 reverse Torque: 400 ft./lbs., Dry Weight: 115-120 lbs., Spline Data: 26T input, 27T output |
|
| TREMEC T56 NAVIGATION |
|
[Retro-Fit T56 Main Page]
[Retro-Fit T56 Helpful Pictures]
[Retro-Fit T56 Pics & Dimensions] [Phillip West’s Retro-Fit T56 Conversion] [GM’s Stock Replacement T-56’s] |
| FROM CAR CRAFT MAGAZINE JANUARY 1994 (CONTINUED) |
 |
The ’93-and-later F-car (Camaro, Firebird, and Trans Am) T56 compatible bellhousing (right) works with the new “pull-type” clutches. It’s not deep enough to clear conventional clutch assemblies. BorgWarner uses the original T5 bellhousing. (left) |
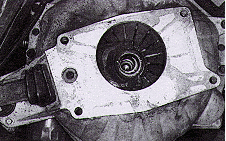 |
Begin by removeing the torque arm, driveshaft, trans mount, crossmember, and T5 trans. Do not remove the stock bellhousing. Note how the factory T5 bellhousing rotates the “traditional” GM trans mounting bolt pattern 18 degrees counterclockwise from vertical. |
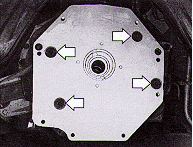 |
Use the four supplied countersunk sockethead capscrews (arrows) to attach the adapter plate to the bellhousing. Note that the plate corrects the trans orientation to “straight up”. Carefully align the clutch disc splines with the input shaft splines, then bolt the trans to the adapter plate. |
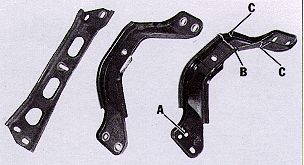 |
The original flat T5 crossmember (left) won’t fit the T56. Instead, get a ’93 T56 crossmember (PN 10198322, center). Modify it so it looks like the one on the right. This involves drilling a new hole (A), cutting the right side off to change its angle (B), and adding new material (C). Details follow below next line. |
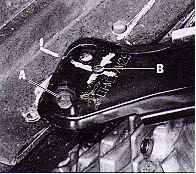 |
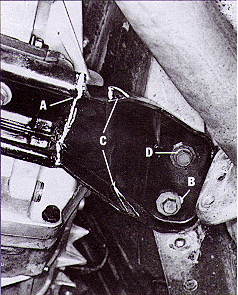
Start with the left-hand side. The new crossmember attaches to the rearmost two threaded factory mounting holes. This requires drilling one new hole in the crossmember that corresponds to the location of the rearmost subframe hole. To find the proper hole location, scribe easily visble line on the subframe through the rear bolt hole that is parallel to the vehicle's longitudinal axis. Scribe a second line at a right angle to the first line through the rear bolt hole. Make the lines long enough so they extend beyond the crossmember when it is in position. Bolt the crossmember and mount to the T56 trans. Install the forward lefthand crossmember-to-subframe bolt(A). Using the ends of the previously scribed lines as a baseline, extend them across the crossmember. Remove the crossmember and drill a 10mm hole at their intersection point (B). |
 |
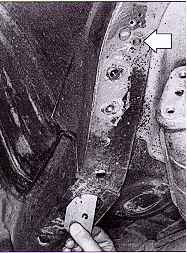
Remount the crossmember to the left-hand subframe. Cut off the crossmember to the right of the mounting pad (A). Bolt the cut-off section's front hole to the rearmost existing tapped hole in the frame channel (B). Section an add new pieces of material (C) to make the crossmember's existing rear hole flush with the frame rail kick-up. Drill a new hole into the frame rail that corresponds to the rear hole in the crossmember (D). |
 |
A blind Rivnut or Nutsert is the “elegant” solution for supplying the female threads required by the newly drilled bolt hole. The low-buck solution is a 2x3x1/2-inch-thick steel or aluminum block. Shove it into position through the large existing hole in the frame as shown so it lines up with the newly drilled crossmember mounting hole (arrow), then drill and tap it for metric M10x1.5 theads. Adding a second (but countersunk) bolt hole to the block from twisting out of position. Finally, bolt the crossmember solidly into position using all four bolts, and final-weld all joints. |
 |
Shorten the rear differential torque arm 1.9 inches by sectioning and rewelding in the area shown. |
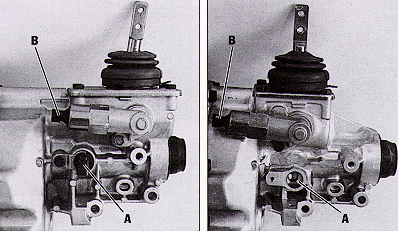 |
Production GM T56s accept only a fully electronic speedometer connector (left photo, A). BorgWarner machines the aftermarket version’s extension housing for the traditional GM speedo cable connection (right photo, A), which accepts both full-mechanical cables and the hybrid ’90-’92 magnetic pickup. Use GM T5 drive and driven gears for speedo calibration. Although the speedo hookup is 2.6 inches farther rearward, the existing cable should still hook up. Shifter location is also revised to conform to the T5 location, eliminating the need for any floorpan mods. In both photos, B indicates the location of the electric reverse-lockout connector receptacle, a common feature on all current T56 transmissions (see T56 Electric Reverse Lockout at the bottom of this page). |
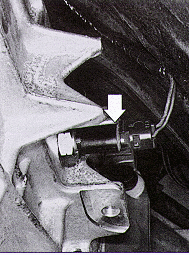 |
The backup light switch is on the opposite side of the transmission as compared to the T5 and will require extending the wire harness to make the connection. |
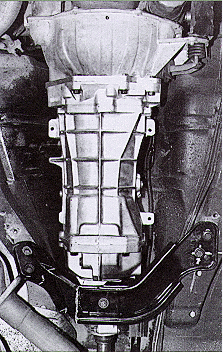 |
The completed T56 trans installation shows the new adapter plate, relocated and modified crossmember, and shortened torque arm. |

|